Saturday, October 30, 2010

Spooky Mantle


I had fun decorating my mantle for Halloween this year. First, I fluffed a lot of black tulle along the bottom. I added my specially-made witch's hat (see the post below), pumpkins, potion bottles, and then made new covers for some of our books. The titles read, "Things That Go Bump In The Night," "Favorite Recipes with Creepy Crawlies," "Witch's Brew for Two," and "Book of Spells." There are plenty of spiders, including some dangling from the ceiling. (Thank you, tall husband.)

Next year I plan to add some of THESE amazing labels from Love Manor to my bottles.

Happy Haunting!

Witch's hats

This year, I fell in love with some really cute witch's hats I had seen around, so I decided to make a few to decorate around the house. First I used a couple of pre-made witch's hats, but they were a little expensive so I decided to make my own. Here's how I did it:

For my patterns, I used a plastic toy cone and a plate that were the sizes I wanted for the finished product. I traced these both onto black poster paper.Form the cone shape with a lot of hot glue.
Cover the pieces both with black satin (Walmart, $2/yard)


I covered the circle by making a very large stitch around the edges and gathering it over the circle.
The cone was pretty easy, I just made a "finished edge" with a hot glue hem, and then attached that side last.Tuck the ends inside the bottom of the cone and secure well with hot glue. (my mom would be so proud with my liberal use of hot glue.) Then apply a generous bead of hot glue all the way around the bottom and stick it onto the center of the circle
Voila!
Now, it's time to decorate! I had a few different thing's I'd picked up: tulle, sheer fabrics, flowers, feathers and crows. Here are my finished products:
(The first two (below) are pre-made witch's hats that I decorated, the second two are the hats I made, as shown above.)

This last one, I specifically made to go on the mantle, so instead of a full circle on the bottom, I cut the poster board flat on one side so that it will nestle up against the wall. It turned out great for what I needed, since my mantle ledge is only about 6 inches wide.

It was fun and I am really enjoying my new Halloween decorations!

Monday, October 25, 2010

I actually HAVE been working on quite a few things, but I haven't had time to take any pictures!

Here are a couple of things I have sewed for our friend, K. (Isn't she so darling?)
This flowered top is made from THIS PATTERN (so easy.)
I also made the luau version for M: (who apparently wasn't very happy that day.)I made this little jumper dress for K, too, and made up the pattern as I went along:
And there are a couple of my projects. What's next?
My friend Tasha (Cherish These Moments Photography) talked me into making some little crocheted photo props for newborn photo sessions. It forced me to learn to read a pattern (thank you, world wide web) and I was pretty excited about that! The pattern was purchased HERE. And, here are some of her photos of the finished products, on some pretty sweet little newborns:
Makes me want one. (a baby, not a crocheted hat.)

Wednesday, September 22, 2010

Pincushion

I was sewing one day and got tired of my pin cushion, so I found a pattern here and tweaked it a little. Here is what I came up with.
I used only scraps and things I already had on hand. I omitted the flower on top because I didn't have any corresponding felt in my stash. I also added about 1/3 cup of uncooked rice at the bottom of the cushion to give it some weight so it wouldn't move too much when I pulled a pin out.

I love it and it makes it more fun to sew when you have darling accessories!

Really inexpensive wall decor

It's fun to remember how cute this room was, before we squished two babies into it! This is Parker's room, a couple of years ago. This wall is huge and I needed something big to fill it, and I had a budget of... nothing. So, I cut the letter's of his name out of large sheets of cardstock. I chalked the edges of each letter and hung them on a clothesline with clothes pins. After about a year, humidity made the letters curl a little, and at that point I would have re-created the process, but by then I had some other ideas and another baby to fit in the room. Anyway, I figured that, for a wall treatment that cost $0, a year is a good run! It bought me some time until I could do something else.

Thursday, September 2, 2010

Is it too early?

The Halloween fabric at JoAnn was too cute to pass up. So I bought this, this morning:
And made this, this afternoon:
Is it too early to start putting up Halloween decorations?

Sunday, August 22, 2010

The day that the Thrift Store gods smiled upon me

Small wreaths are great for some things, but lately I have been in love with HUGE front door wreaths. So, this week I was wandering through a thrift store and I found the parts to a fabulous new autumn wreath for my front door. I found this 14-inch berry wreath and a matching garland for $5 each. I snatched them up. A few days later, at Hobby Lobby, I found this great 29-inch grapevine wreath form on sale for 50% off! (I paid $6.50.)Last night I started ripping the garland and small wreath apart. The garland was best; the little sections each came apart with a long bendable wire on the end. The wreath sections were shorter and had to be hot-glued onto the final project. Once the little segments were all separated, I started attaching them to my huge wreath. I started by putting them at equal intervals (12, 3, 6 and 9 positions) and then filling in between. The last few were just glued in where I saw a bald spot. Here's the finished wreath. I love it. Total cost: $16.50.
The hardest part about this wreath will be waiting a few more weeks for Autumn to be here so that I can hang it on the door!

Friday, August 20, 2010

Due to overwhelming demand....

... actually, just because Brittney asked, I am posting some projects I've been working on. Here are some from this summer.

When my niece was here, we bought her a cute skirt from DownEast:Then we decided she needed another one, so we chose this fabric and I made this skirt pattern off the DownEast one. It was lined and used interfacing, so it was a little challenging but turned out pretty well: And of course M had to get something out of the sewing frenzy: (I just made this up. I had seen something similar sewn by Aunt Penny, but didn't have a pattern.)Going back to June, I made this "Father's Day Garland" for my babies' daddy. (the shirt is a basic origami shirt pattern found here and then I personalized it by making them look like three shirts he actually owns.)
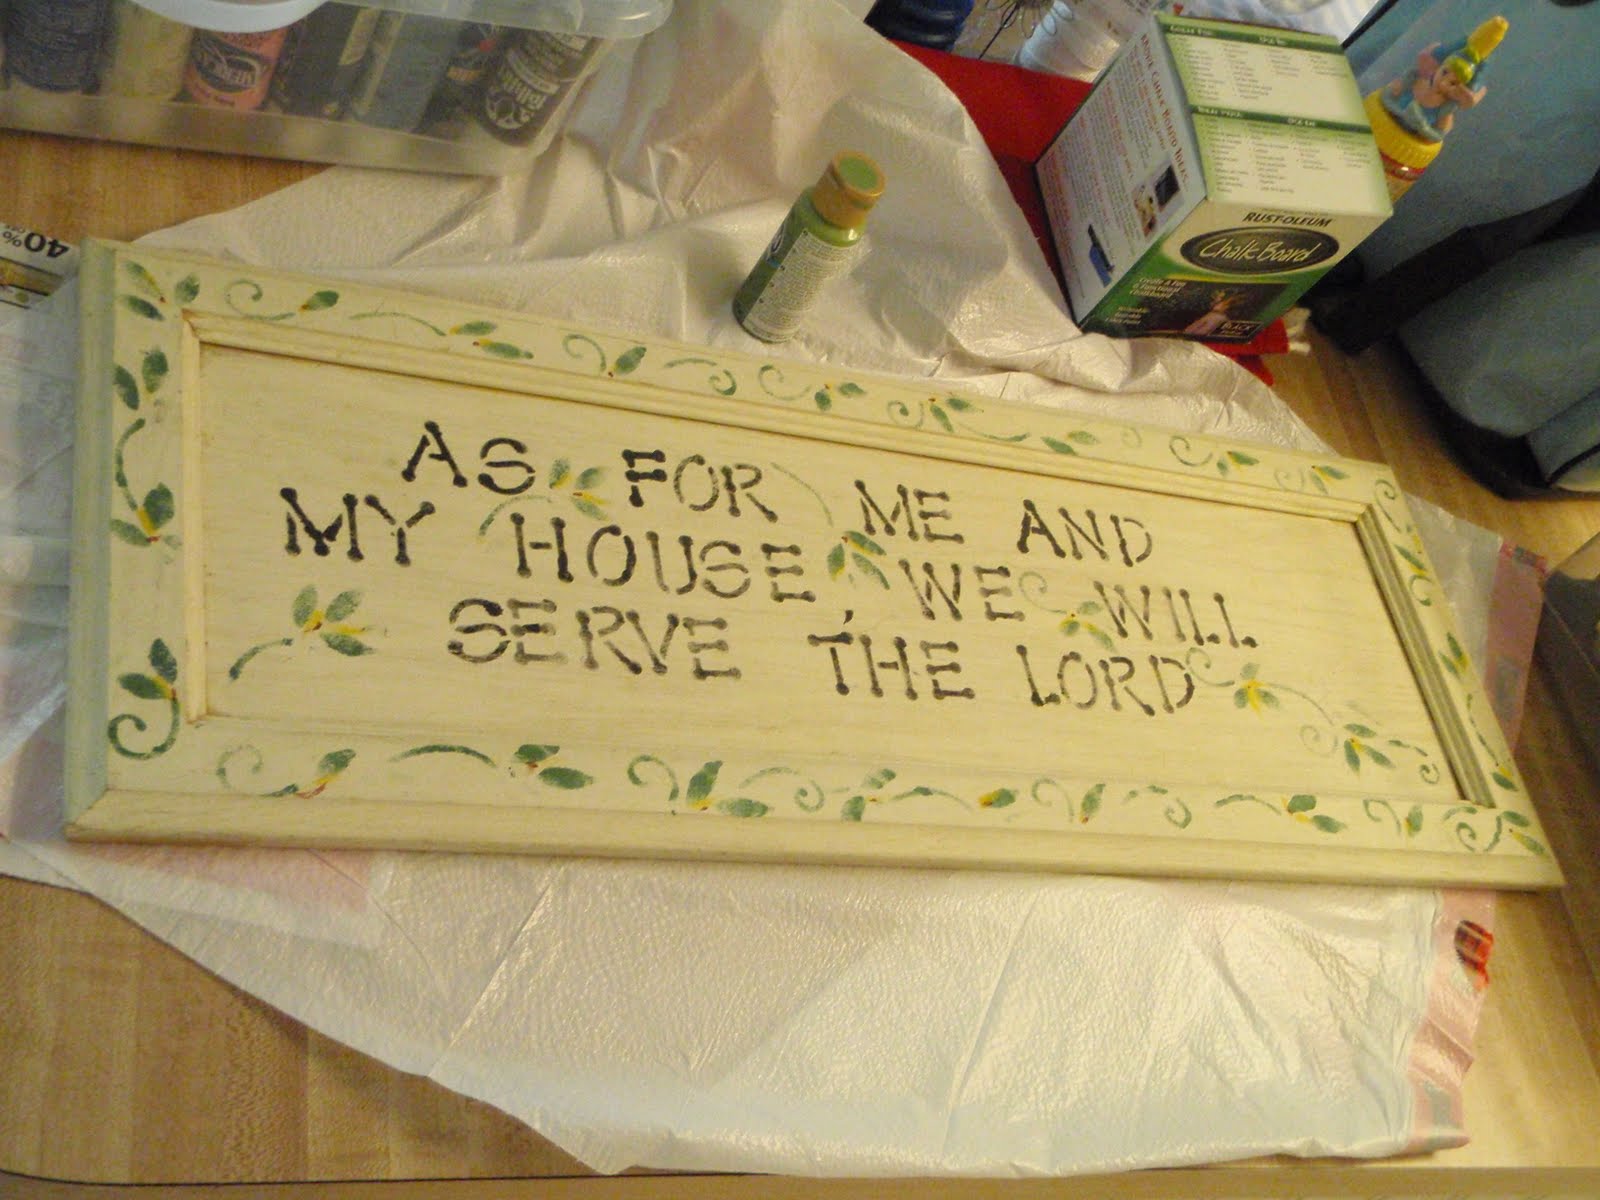
A couple of years ago, I found a hideous attempt at home decor while thrift shopping. I came close to throwing it away many times, but finally got around to making something out of it. Here it is as I found it:And here's what I ended up doing with it. It's amazing what a little paint, some sanding, and some chalkboard paint can do! (it was just a cupboard door to begin with, but I liked the proportions.)In the middle of another sewing frenzy, I made my offspring each a "coloring bag." The amazing thing about these bags is that, once completed, they have actually inspired the children to color! Each bag holds 5 or 6 coloring books and a 24-pack of crayons:The most ambitious project I tackled from my kitchen table was, ironically, the kitchen table itself. Before, I had a rectangle table which was graciously loaned to me by a cousin. I also had four wood chairs which happened to match the loaner table. Here is the original state of the chairs. Functional, but they don't do a thing for me:But after a few (actually about a million) coats of paint, and a $25 thrifted table, here is my "new" eating/crafting surface:
That's: sanding, priming, 2 coats of black base coat and three coats of acrylic topcoat. It took weeks to finish. Never again....